In the world of print, experience is invaluable—but even the most seasoned professionals can stumble when details are overlooked. Whether you’re new to printing or a veteran, having a well-prepared checklist is the key to saving time, cutting costs, and avoiding unnecessary stress. Before sending your files to press, ensure everything is in order with this essential guide.
Your Must-Have Print Checklist:
- Consult Before You Commit
No two print jobs are exactly alike. Before diving in, connect with your GV printing partner to ask, “Is there anything I should know for this specific project?” Even minor adjustments can make a big difference in the final outcome. - Verify File Format
Most projects require a press-ready PDF, but don’t assume! Full native file assets may be required. Double-check file submission guidelines with your GV account representative to avoid delays. - Resolution Check
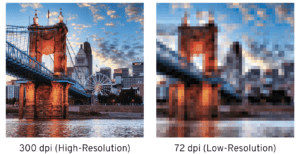
Images should typically be 300 dpi at 100% size for optimal clarity. For large-format prints, the resolution may vary based on viewing distance. 150 dpi (at 100% size) is suggested, but consult your GV account representative for recommendations. - Color Mode Matters
Always design in CMYK (process color) format—not RGB. All raster and vector images should also be in CMYK format before sending to press. Colors that appear vibrant on-screen in RGB can shift during the conversion to CMYK. Starting in CMYK ensures consistent, accurate colors and gives you full control over the final print result. - Set Bleeds and Margins
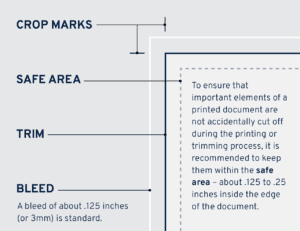
If your design extends to the edge of the page, include a bleed (usually 0.125 inches). For non-bleed designs, maintain safe margins to avoid accidental cropping. - Mind Your Fonts
To avoid font substitution, ensure all fonts are either included, embedded or converted to outlines. This keeps your text looking exactly as intended. - Optimize Layers and Files
Flatten unnecessary .tif file layers in Photoshop to streamline file size and prevent transparency issues. Logos and icons should always be in vector format for scalability and precision. - Package It Right
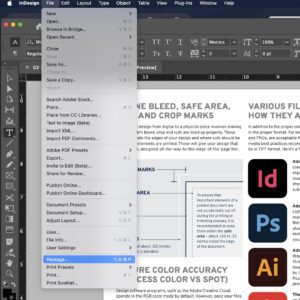
When using Adobe InDesign for layout, the “Package” feature collects all fonts, linked images, and various other file assets, ensuring nothing gets lost in translation. For extra security, provide an additional “Press-Quality” PDF with bleed and crop marks for the final handoff.
Pro Tips for Print Success:
- File Type Matters: Use .tif files for image quality and vector files for logos and icons to ensure crisp, professional results. Avoid .jpgs and .pngs, which can lose clarity during printing.
- Preflight for Perfection: Adobe InDesign’s Preflight panel flags errors before submission, saving you from costly misprints.
- Communication Is Key: Review your final package with your Graphic Village representative to confirm specs and avoid surprises.
By following these steps, you can ensure your print project transitions smoothly from concept to completion. Proper preparation doesn’t just save time—it guarantees a polished, professional result every time.
Ready to start your next print project? Contact us today to make it flawless from the first print to the last!


